
The custom element feature in Webflow is a game-changer, offering powerful capabilities to elevate your web development projects. Here are 8 use-cases to supercharge your workflow:
1. DOM Video Element

Embedding native video elements directly into your website is a great way to improve performance and user experience. By using a custom DOM video element, you can easily render videos from any external source, offering more flexibility and better load times.
Steps to Add a DOM Video Element
- Add a Custom Element: Begin by creating a custom HTML element.
- Set the Tag to 'Video': Use the 'video' tag for embedding the video content.
- Include the Following Key Attributes:
- playsinline="true": Ensures the video plays inline on mobile devices.
- src="{your video link}": Insert your video URL here.
- muted="true": Set the video to play without sound by default.
- loop="true": Loop the video continuously for seamless playback.
- autoplay="true": Automatically start the video when the page loads.
- poster="{link to your cover image}": Display a cover image before the video starts.
Pro Tip
For dynamic video content, connect the video element to your CMS (Content Management System). This enables you to manage and update your videos easily, making your site more engaging and interactive.
By implementing these best practices, you’ll enhance your site’s performance, user experience, and SEO by ensuring faster video load times and a seamless user journey.
Cloneable: DOM Video Element
2. SEO-Friendly Headings with Elements Inside
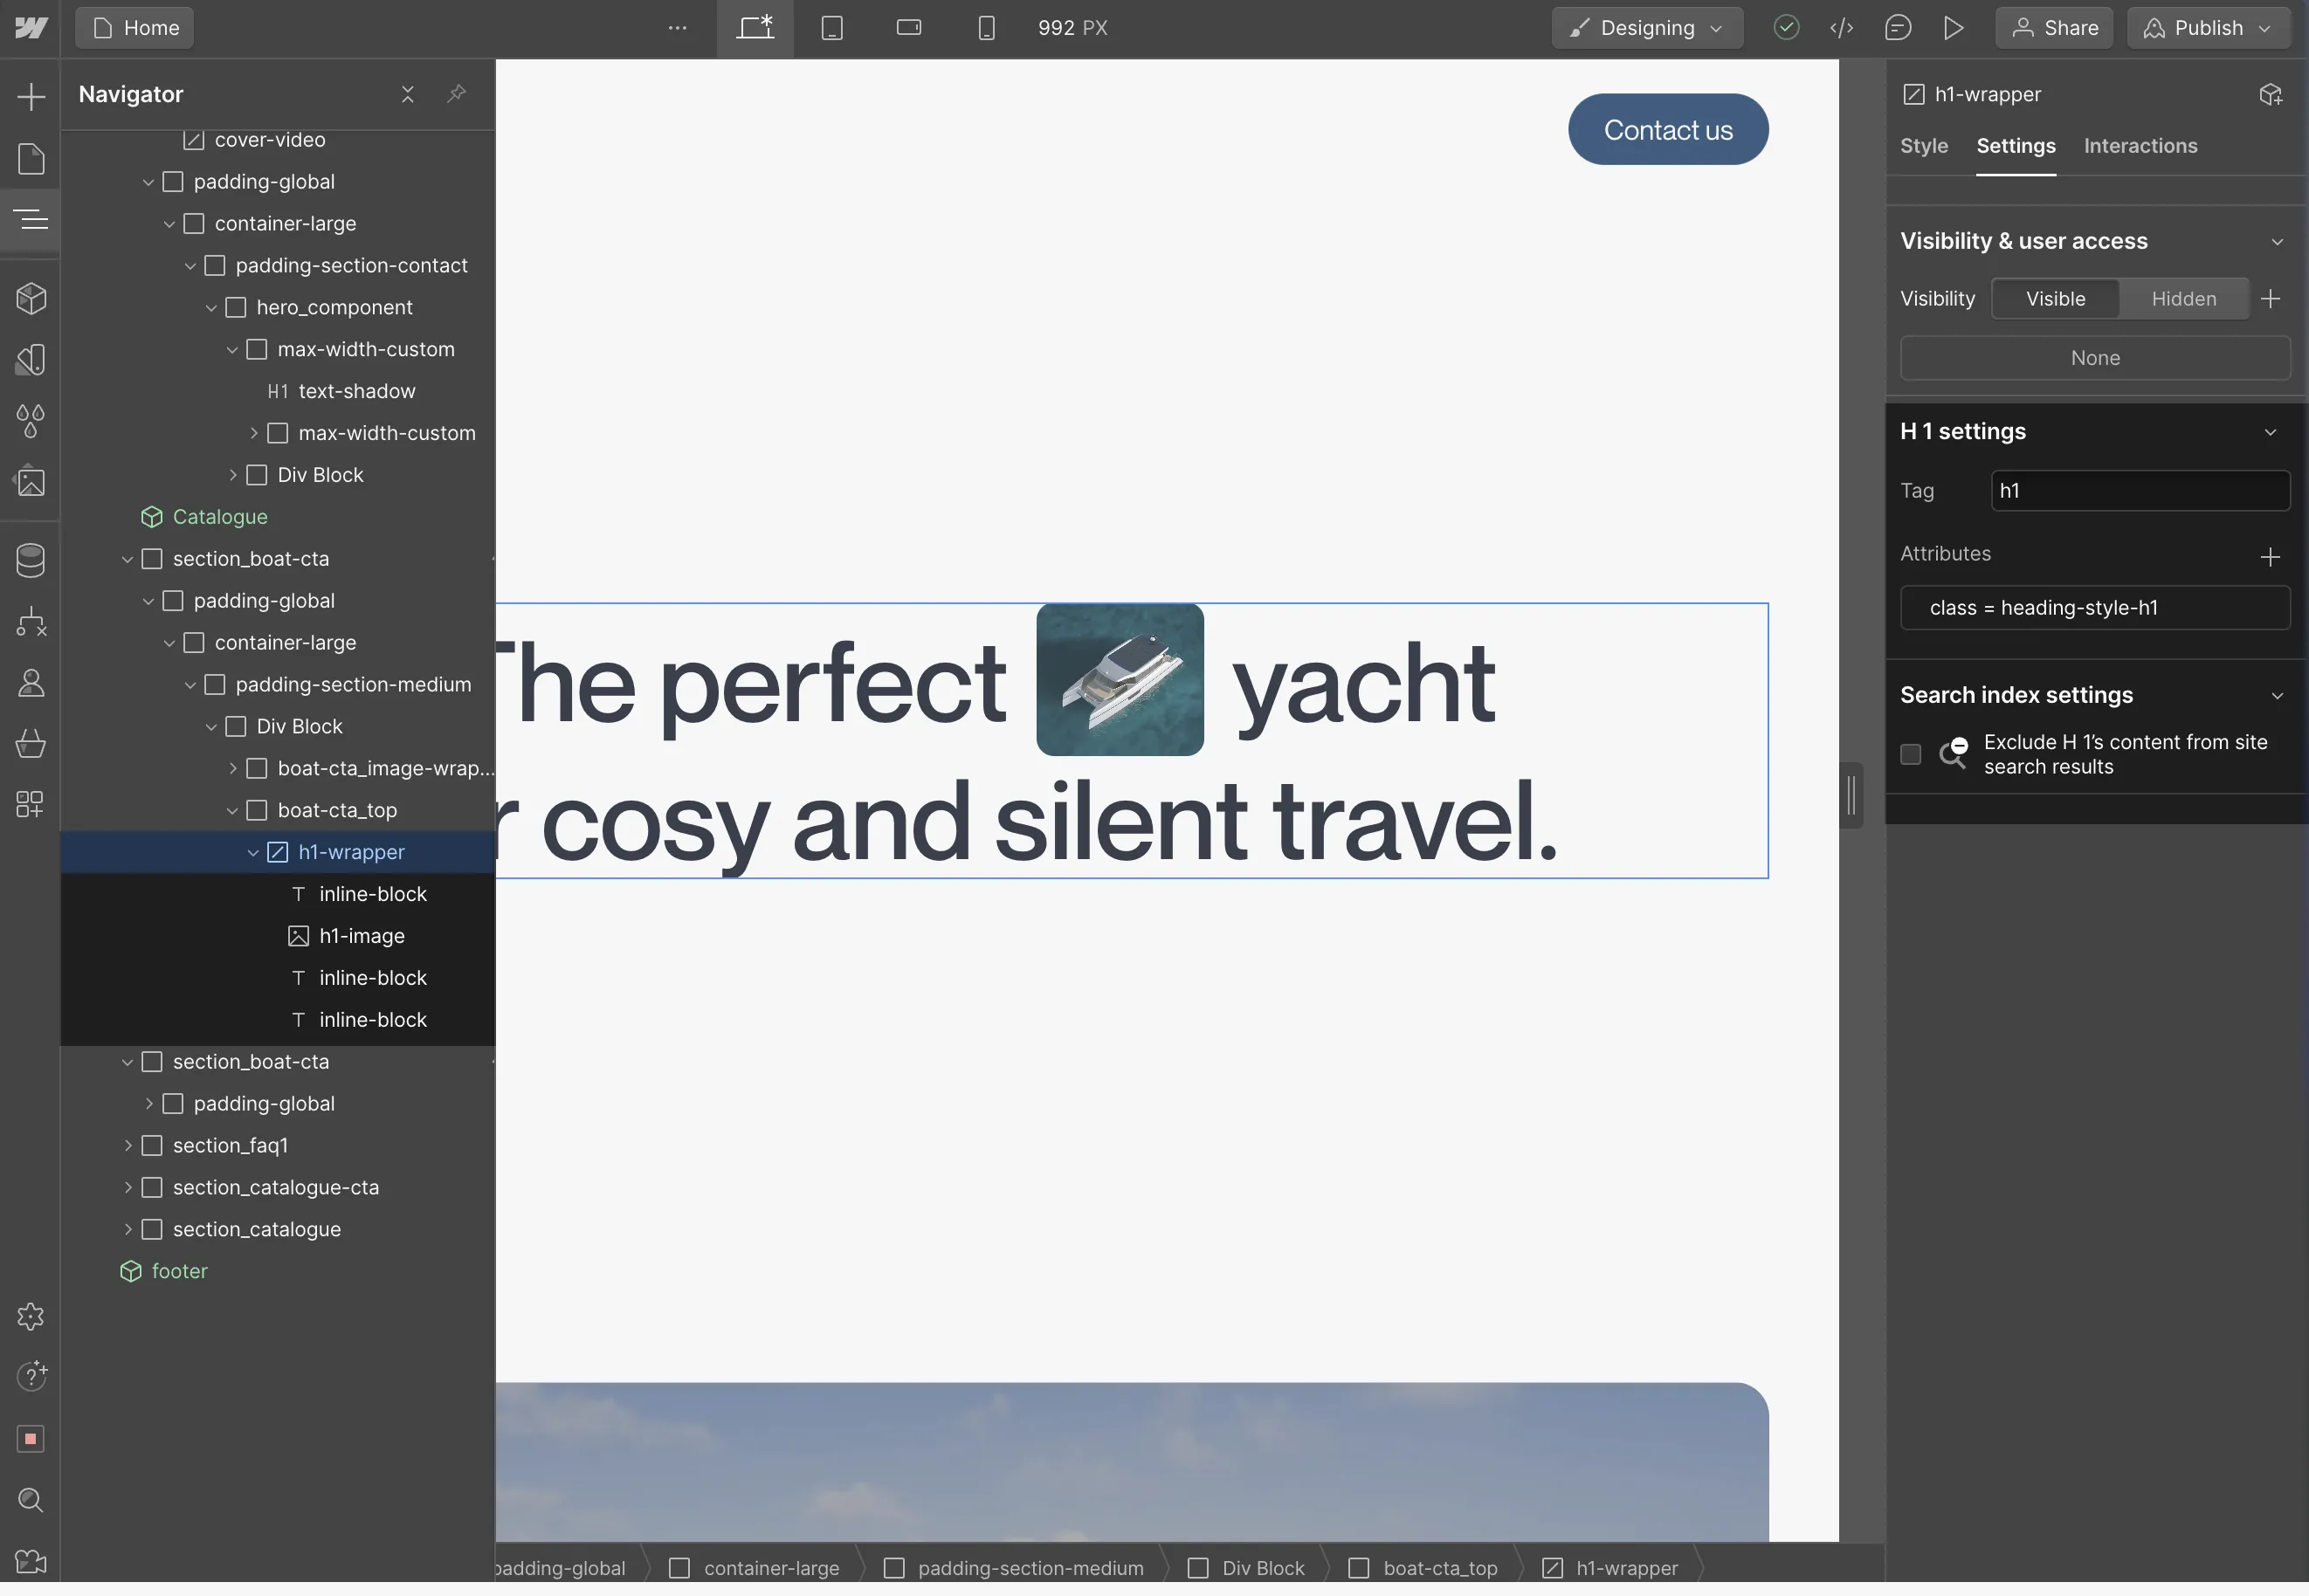
Headings play a pivotal role in SEO, as search engines rely on them to understand the structure and hierarchy of your content. However, adding visual elements like images, icons, or illustrations inside headings can disrupt this structure, potentially hurting your SEO performance.
With Webflow’s custom elements, you can easily incorporate graphics or icons within your headings without compromising their SEO value. This allows you to maintain the integrity of your HTML heading tags while creating visually appealing designs.
Steps to Create SEO-Friendly Headings with Elements
- Add a Custom Element: Insert a custom element to use as your heading.
- Change Tag to 'H1' (or any other appropriate heading tag): Ensure you're using the correct heading tag for your content hierarchy (H1 for primary, H2 for subheadings, etc.).
- Insert Visual Elements: Add the image, icon, or other elements inside the heading without disrupting the text structure.
- Add a Text Block: Include your heading text as part of the block.
- Style the Text Block: Set the text block as an inline-block element with appropriate margins to ensure proper spacing and alignment.
Why This Matters for SEO
- Maintain Heading Structure: Keeping the HTML structure intact ensures search engines can still index your headings properly, enhancing your chances of ranking.
- Combine Visual Appeal and Optimization: By carefully embedding visual elements, you can create visually engaging content without sacrificing SEO performance.
- Improved User Experience: Visually enriched headings can attract attention, keeping users engaged, which indirectly benefits your SEO through reduced bounce rates.
By following these steps, you’ll be able to create SEO-friendly, visually appealing headings that rank well in search engines and provide a better user experience on your website.
Cloneable: Element inside heading
3. Native Calendar Within a Form

Integrating a native calendar into your form is an excellent way to enhance user experience, allowing visitors to select dates with ease and accuracy. Native calendars are not only user-friendly but also reduce input errors, making them an essential feature for forms that require date selection (e.g., booking forms, appointment schedulers, etc.).
Steps to Add a Native Calendar to Your Form
- Add a Custom Element to Your Form: Begin by inserting a custom element within your form.
- Change Tag to 'Input': Use the 'input' tag to designate the field for user input.
- Set the Following Attribute:
- type="date": This attribute enables the native calendar, automatically allowing users to select a date via a pop-up calendar interface.
Benefits of Using a Native Calendar
- User Convenience: Provides a simple, intuitive way for users to select dates, reducing manual input errors.
- Mobile-Friendly: Native calendars are optimized for mobile devices, ensuring a smooth experience across all platforms.
- Improved Data Accuracy: Ensures that dates are entered in a consistent format, which helps streamline form submissions and data processing.
By incorporating a native calendar, you can enhance your form’s usability, improve the accuracy of user submissions, and ensure a seamless experience across both desktop and mobile devices.
Cloneable: Native Webflow DOM Inputs
4. Custom Blockquote Within Rich Text
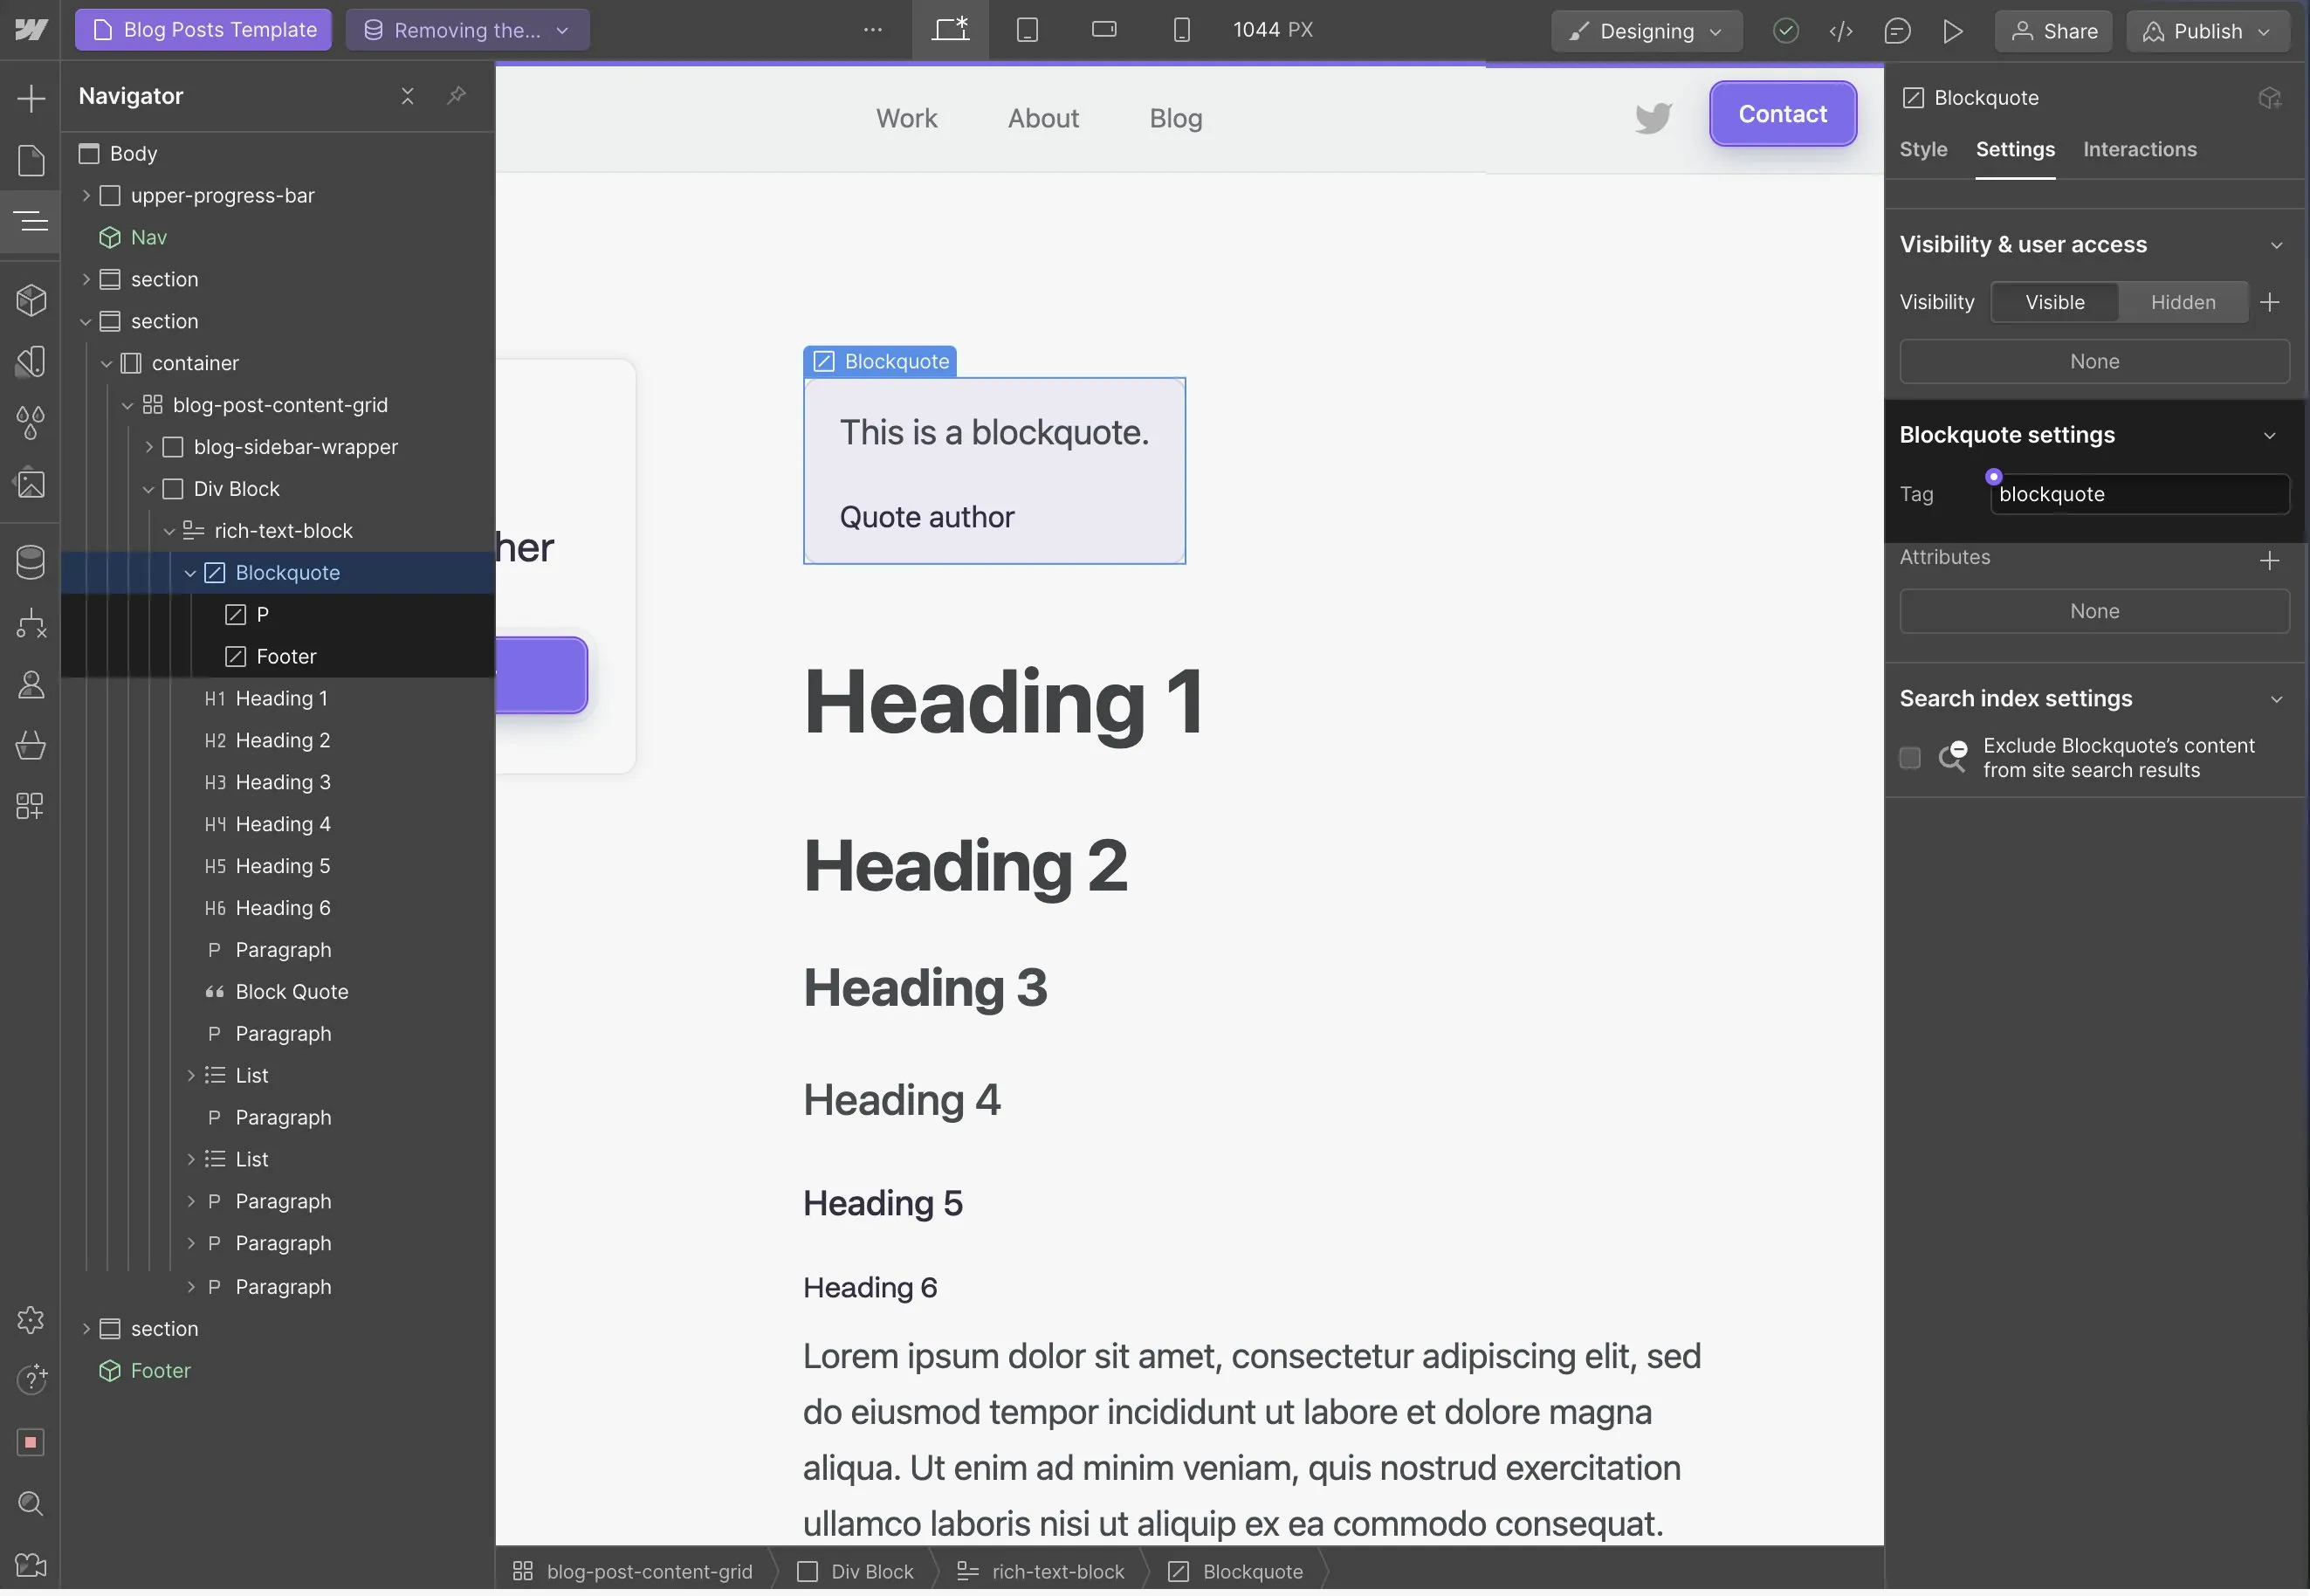
In Webflow, blockquotes are a powerful way to display quoted text or emphasize key sections within your content. They are typically styled to stand out from the regular text by using indentation, unique fonts, or additional visual elements. By utilizing custom elements, you can fully personalize blockquotes in your rich text fields to match your design and branding.
Steps to Create a Custom Blockquote in Webflow
- Add a Custom Element to Your Rich Text: Insert the custom element where you want the blockquote to appear within your rich text content.
- Change the Tag to 'blockquote': Set the tag to ‘blockquote’ to ensure proper HTML formatting for quoted content.
- Customize to Your Liking:
- Adjust the font style, size, and color to make the blockquote stand out.
- Add visual elements such as borders, background colors, or icons to enhance its appearance.
- Optionally, include padding or indentation to align with your site’s design aesthetics.
5. Native iframe
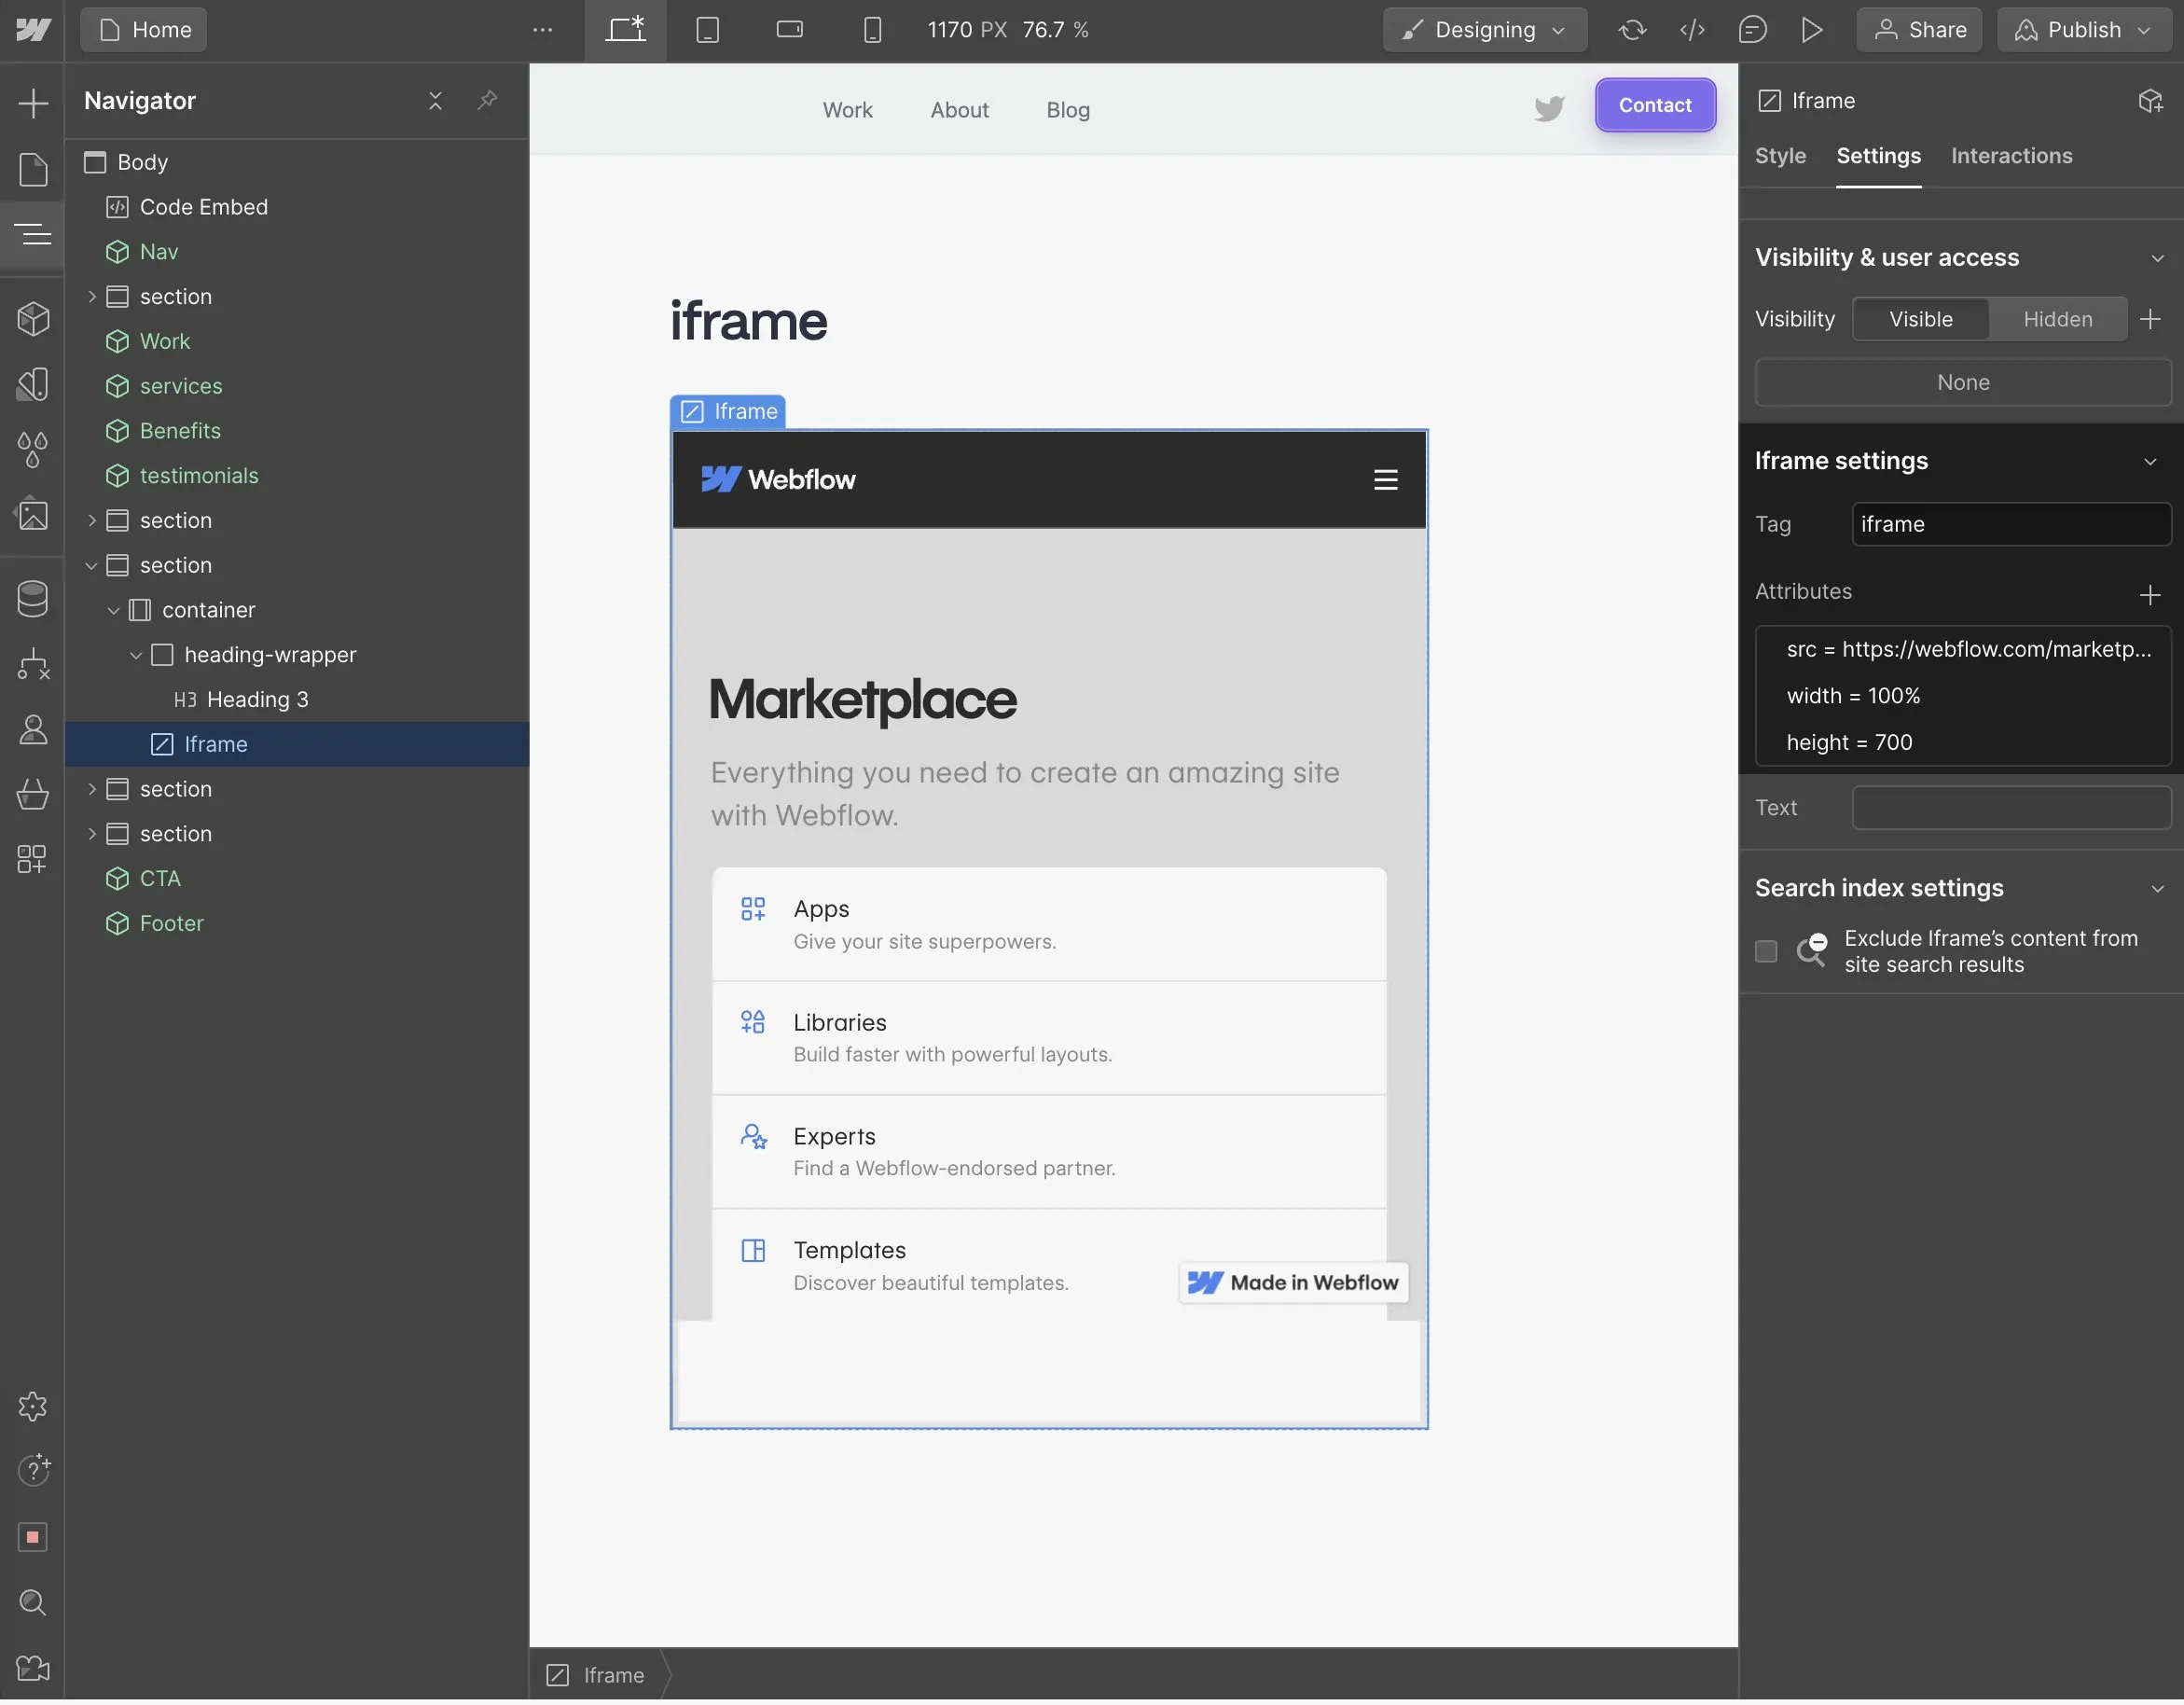
An inline frame, commonly referred to as an iframe, is a versatile HTML element that allows you to embed another webpage or external content within your own website. Iframes are widely used for embedding content such as advertisements, videos, web analytics tools, or interactive media without disrupting the layout of your page.
Using Webflow's DOM element, you can easily embed native iframes in your site for seamless integration and enhanced functionality.
Steps to Add a Native Iframe in Webflow
- Add a Custom Element: Insert the custom element into the area of your site where you want to display the iframe content.
- Change the Tag to 'iframe': Set the element’s tag to ‘iframe’ to embed external content.
- Include the Following Attributes:
- src="{your HTML link}": Enter the URL of the external webpage or media you want to display inside the iframe.
- width="100%": Set the iframe width to span the full width of its container.
- height="{insert number}": Specify the height of the iframe to fit your layout and content.
6. Range Slider

A range slider is a valuable UI element that allows users to select a value or range of values by sliding a handle along a track. It's commonly used in forms for filtering options, such as price ranges or ratings, providing a more interactive and engaging user experience.
In Webflow, adding a native range slider to your forms is simple and enhances both usability and functionality.
Steps to Add a Range Slider in Webflow:
- Add a Custom Element to Your Form: Begin by inserting a custom element within your form where you want the range slider to appear.
- Change the Tag to 'input': Set the element’s tag to ‘input’ to enable user interaction.
- Configure the Range Slider:
- Type: Set the type attribute to "range" (
type="range") to activate the slider functionality. - Min/Max Values: Optionally, set the minimum and maximum values for the slider (
min="{minValue}",max="{maxValue}"), depending on the range of options you want users to select. - Step: Define the step value (
step="{value}") to control the increments in which users can adjust the slider.
- Type: Set the type attribute to "range" (
Cloneable: Native Webflow DOM Inputs
7. Native Audio Player
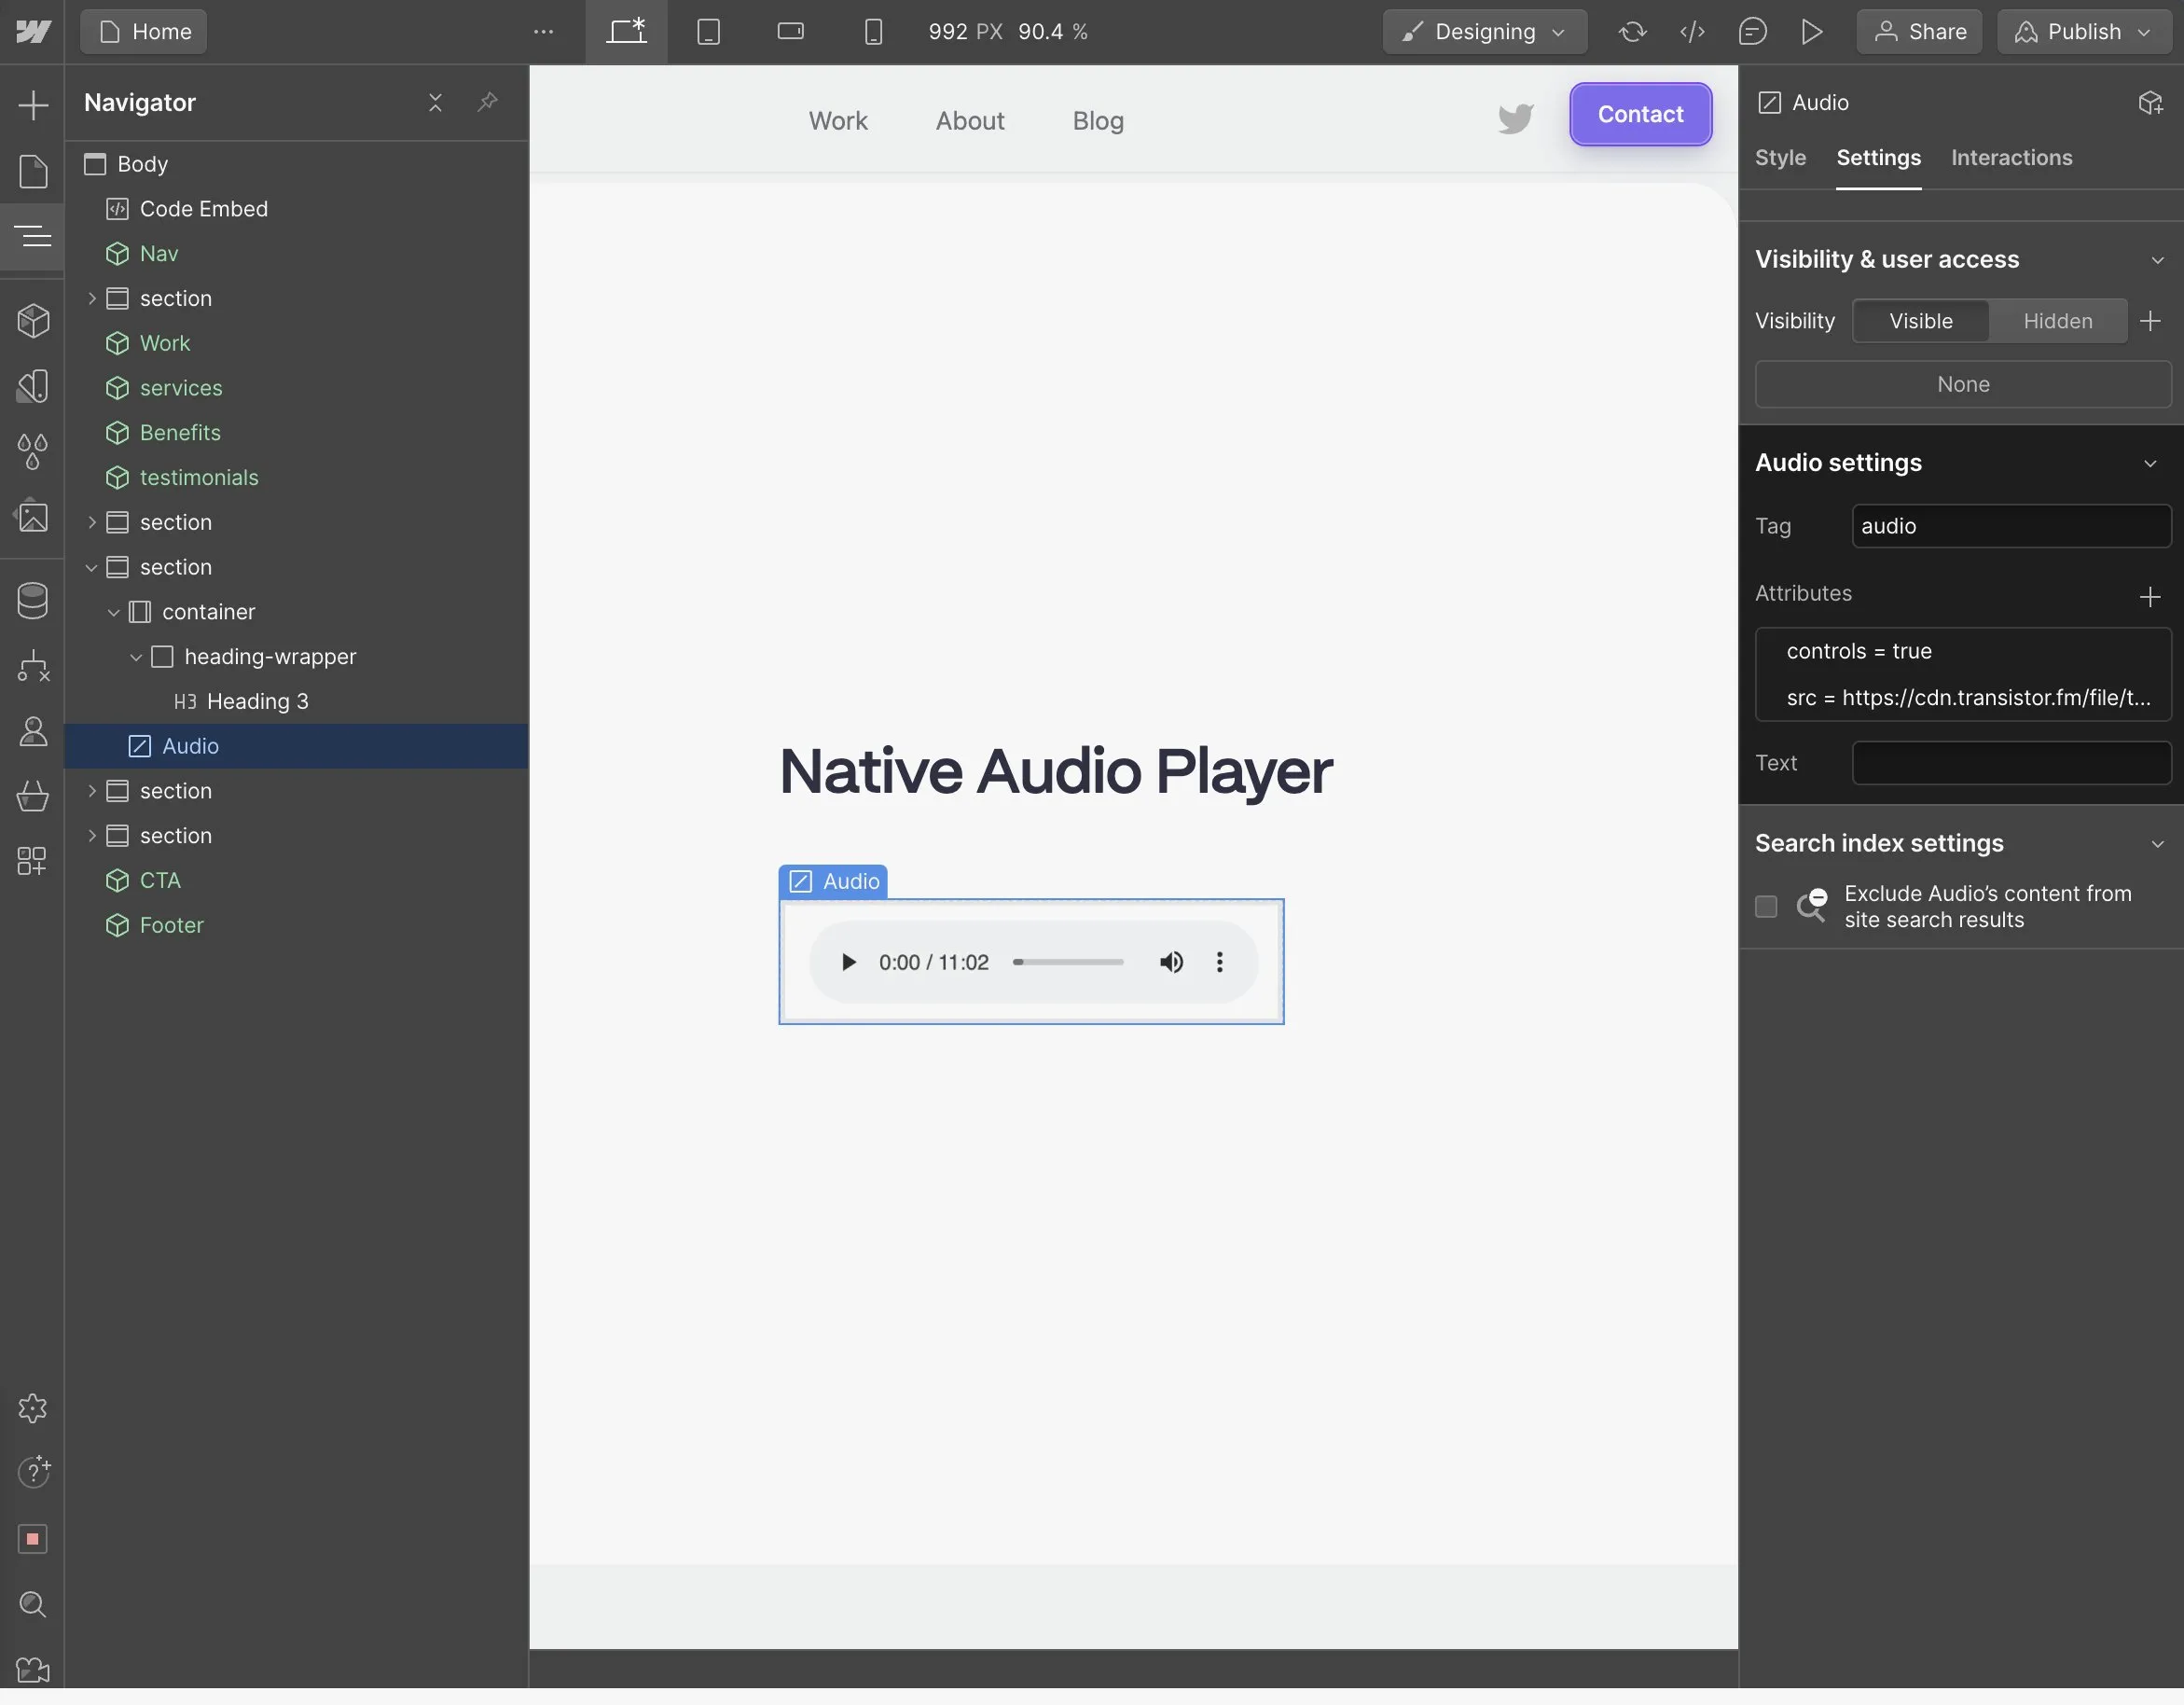
Adding a native audio player to your website allows you to offer seamless audio playback directly on your site, making it easy for users to listen to podcasts, music, or audio clips without needing third-party apps or plugins. Native audio players are lightweight, responsive, and provide a great user experience across devices.
Steps to Add a Native Audio Player in Webflow:
- Add a Custom Element: Insert a custom element into the section of your website where you want the audio player to appear.
- Change the Tag to 'audio': Set the tag of the custom element to
audioto enable the native HTML5 audio player functionality. - Include the Audio Source:
- src="{your audio link}": Add the source URL of your audio file (MP3, WAV, etc.).
- Optionally, include controls="true" to display the default audio controls, such as play, pause, and volume.
Why Use a Native Audio Player?
- No Plugins Required: Native audio players work directly within your website's code, so there's no need for third-party plugins or applications.
- Cross-Device Compatibility: The audio player is optimized for mobile devices, desktops, and tablets, ensuring smooth playback across all platforms.
- SEO Benefits: Embedding audio content can help with SEO, as multimedia content like podcasts can increase dwell time and engage users.
By embedding a native audio player in your website, you provide an immersive audio experience for your visitors, enhancing your content’s accessibility and user engagement.
8. Color Input
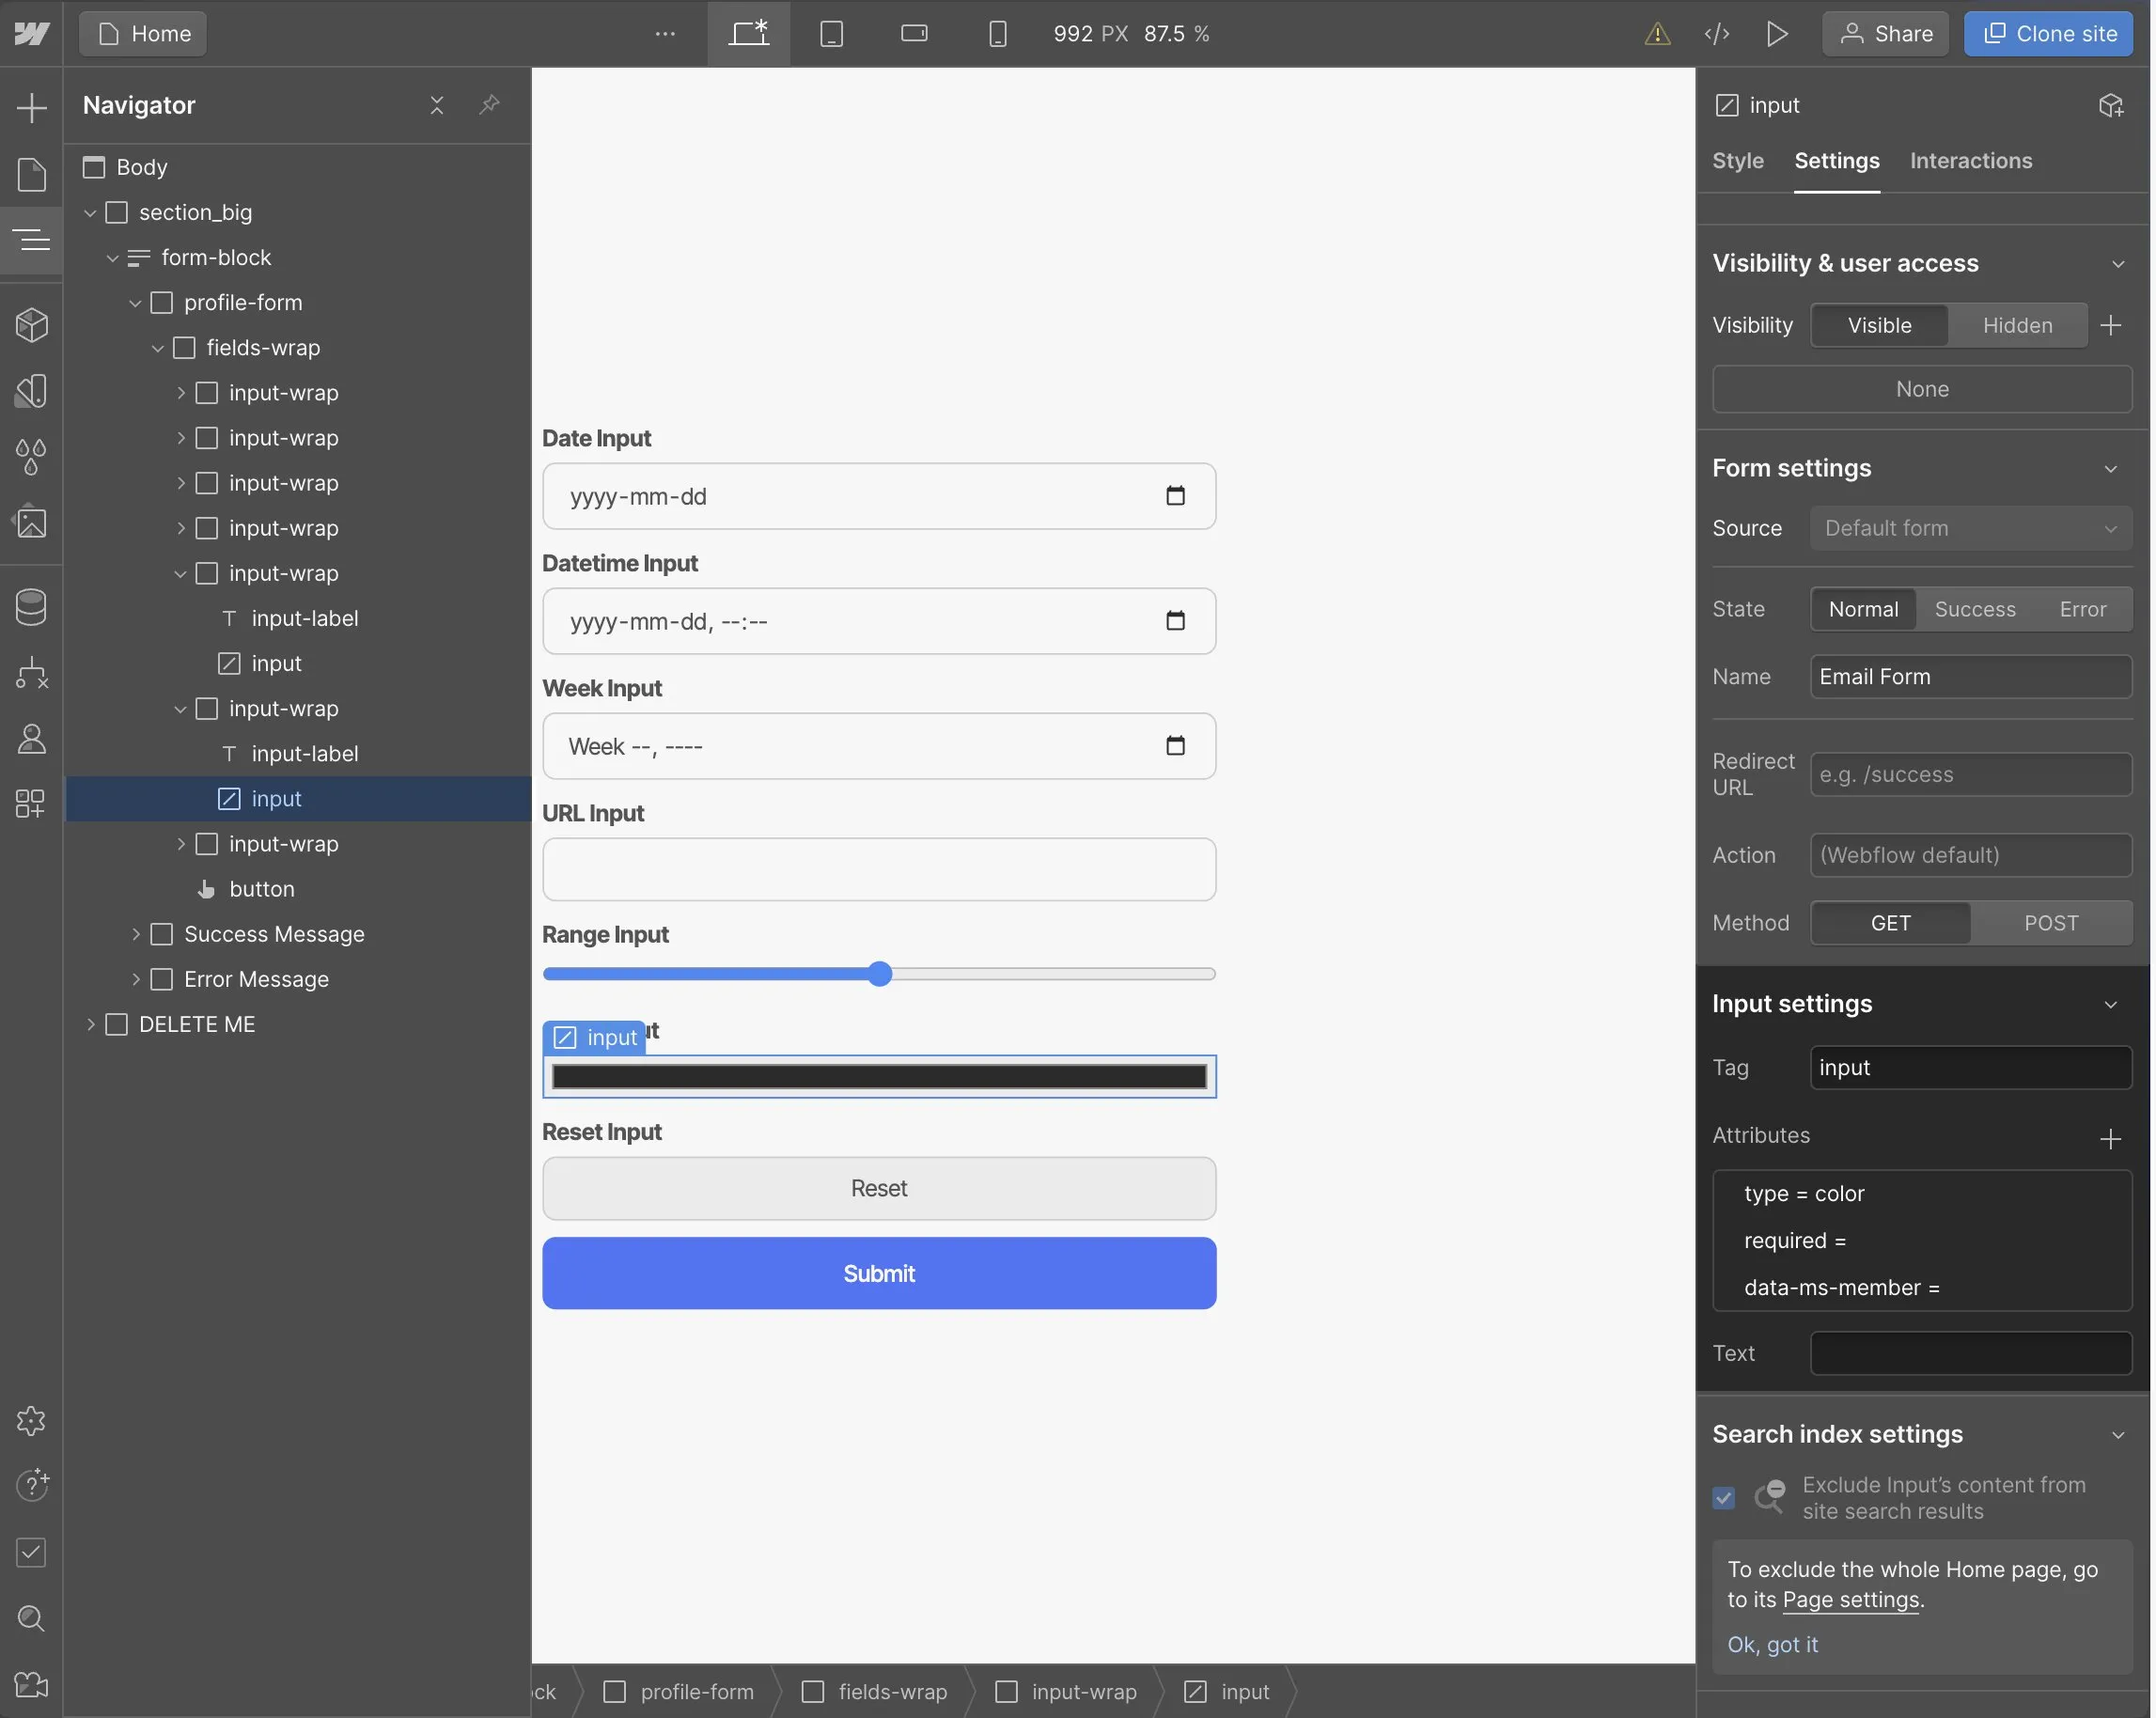
Incorporating a native color picker into your forms allows users to easily select and input colors with a built-in color palette. This feature is especially useful for customization forms, product options, or any interactive element that requires user-selected color input.
Steps to Add a Native Color Picker in Webflow:
- Add a Custom Element to Your Form: Insert a custom element into your form where you want the color picker to appear.
- Change the Tag to 'input': Set the element’s tag to
inputto enable user interaction. - Set Input Type:
- type="color": Set the input type to
colorto activate the color picker interface.
- type="color": Set the input type to
Cloneable: Native Webflow DOM Inputs
Conclusion
The custom element feature in Webflow is truly a game-changer for web developers, enabling greater flexibility and control over website functionality. With the ability to create custom HTML elements, Webflow empowers you to enhance user experience, improve site performance, and elevate the overall design of your projects.

.webp)

